Pages

Sunday, May 31, 2020

A simple case of Decorator Pattern

I recently came across a situation where we were calculating the total of a product in one section of our code. The section had multiple ifs and elses to correctly devise the different fees to be add on top of the base price. Debugging that code led to me write this post where we may be able to simplify the code and make it more readable.

In this post, we will take a look at calculating coffee price with different add-ons.

We have coffee which is our base product, then we add different add-ons and each add-on can add a simple price on top of it. And finally leading to tax calculation giving us the total amount.

We can think of this as wrapping the base product (coffee) with each add-on as in following picture:

Coffee with Add-Ons

Thinking in terms of code, each of the layer can be thought of creating a new object and each of those layer takes the object creating before it. So, Creamer takes Coffee object, Sweetner takes Creamer object and so on. In order to achieve this, it makes sense they either derive a common class or implement a common interface. 

Let's call the interface IProduct. Since, we have to calculate the price, let's add GetPrice() as well.

interface IProduct{
double GetPrice();
}

Now, I can create a Coffee class implementing IProduct

class Coffee : IProduct {
public double GetPrice() => 3;
}

What about the add ons? Each add-on should add a price on top of the base product which can be achieved by

class AddOn: IProduct {
private IProduct _addOn;
private double _price;

public AddOn(IProduct addOn, double price){
_addOn = addOn;
_price = price;
}
public double GetPrice() => _price + _addOn.GetPrice();
}

Since AddOn and Coffee both implement IProduct. We can achieve the "wrapping" as follows

var coffee = new Coffee();
var coffeeWithCreamer = new AddOn(coffee, .20);
var coffeeWithCreamerAndSweetener = new AddOn(coffeeWithCreamer, 1);
To get the total price I can simply call
Console.WriteLine(coffeeWithCreamerAndSweetener.GetPrice());
// prints 4.2
    

How about tax? The calculation of tax is not the same as AddOn. In case of tax, we pass percent rather than price. So we create a new class for it also implementing IProduct

class TaxDecorator: IProduct {
private IProduct _addOn;
private double _percent;

public TaxDecorator(IProduct addOn, double percent){
_addOn = addOn;
_percent = percent;
}
public double GetPrice() {
var total = _addOn.GetPrice(); 
return total + ((total * _percent) / 100);
}
}

I specifically use the word "Decorator" in the above class name. This pattern is famously known as the Decorator Pattern. We "decorate" or "wrap" an object with another without changing any behavior of those objects.

So, finally I can add different price on top of our base product, basically decorating it with multiple add-ons, and are able to get the total price at the end. Much more cleaner and readable code than what we have.

var coffee = new Coffee();
var coffeeWithCreamer = new AddOn(coffee, .20);
var coffeeWithCreamerAndSweetener = new AddOn(coffeeWithCreamer, 1);
var totalWithTax = new TaxDecorator(coffeeWithCreamerAndSweetener, 8);
Console.WriteLine(totalWithTax.GetPrice());
// prints 4.536


Tuesday, November 13, 2012

Implementing Custom Config Section - Part 2

This is the Part Two of "Implementing Custom Config Section". You can visit Part One here.

In part one, we looked at config sections that have non-repeating name value pairs.The config section we would like to have here have repeated name value pairs, added to the section using <add>  similar to appSettings section. So, lets get started.

Step 1 - Define your configuration section

Add your configuration section to your web.config, app.config, or machine.config file. I have mine setup as follows:
<MyConfig>
    <MyConfigSettings>
      <add key="1" setting1="setting11" setting2="setting12" />
      <add key="2" setting1="setting21" setting2="setting22" />
      <add key="3" setting1="setting31" setting2="setting32" />
    </MyConfigSettings>
</MyConfig>
Note: You need to have a wrapper element around your settings, in this case <MyConfig>.


Step 2 - Define a class for your elements

The second step is to define a class that inherits from System.Configuration.ConfigurationElement describing each element inside <add> as a property. It looks like:

  public class MyConfigElement : System.Configuration.ConfigurationElement
    {
        [System.Configuration.ConfigurationProperty("key", IsRequired = true)]
        public string Key
        {
            get
            {
                return this["key"as string;
            }
        }
 
        [System.Configuration.ConfigurationProperty("setting1", IsRequired = true)]
        public string Setting1
        {
            get
            {
                return this["setting1"as string;
            }
        }
 
        [System.Configuration.ConfigurationProperty("setting2", IsRequired = true)]
        public string Setting2
        {
            get
            {
                return this["setting2"as string;
            }
        }
    }

Step 3 - Define a class for your setting element

The third step is to define a class that inherits from System.Configuration.ConfigurationElementCollection. This is the class that will represent the collection of your settings.

  public class MyConfigSetting : System.Configuration.ConfigurationElementCollection
    {
        public MyConfigElement this[int index]
        {
            get
            {
                return base.BaseGet(index) as MyConfigElement;
            }
            set
            {
                if (base.BaseGet(index) != null)
                {
                    base.BaseRemoveAt(index);
                }
                this.BaseAdd(index, value);
            }
        }
 
        protected override System.Configuration.ConfigurationElement CreateNewElement()
        {
            return new MyConfigElement();
        }
 
        protected override object GetElementKey(System.Configuration.ConfigurationElement element)
        {
            return ((MyConfigElement)element).Key;
        }
    }
Note: Notice how it will be accessing your elements using the key element. You can name the key anything you like, but it must be unique, and returned from  GetElementKey() method.

Step 4 - Define a class for your custom section

The fourth step is to define a class that represents your custom section. This has to inherit from System.Configuration.ConfigurationSection. The important thing to notice here is the section/element name you have used to define your custom config will be used.

namespace Brinks.CompuSafe.SafeServer.Web.Internal
{
    public class MyConfig : System.Configuration.ConfigurationSection
    {
        // The section name used in config file
        private static string sectionName = "MyConfig";
 
        public static MyConfig GetConfig()
        {
            return (MyConfig) System.Configuration.ConfigurationManager.GetSection(MyConfig.sectionName) ??
                   new MyConfig();
        }
 
        // The settings name used in config file
        [System.Configuration.ConfigurationProperty("MyConfigSettings")]
        public MyConfigSetting MyConfigSettings
        {
            get { return (MyConfigSettingthis["MyConfigSettings"] ?? new MyConfigSetting(); }
        }
    }
}

Step 5 - Define the section group in configSection

The final step is to add the section name definition in configSections of the config file as follows:
<configSections>
    <section name="MyConfig" type="BlogTestSample.MyConfig, BlogTestSample"/>
</configSections>
The type has two params: the full namespace(namespace with class), and assembly name.

Accessing Settings

To access it is really simple:
var settings = MyConfig.GetConfig().MyConfigSettings;
foreach (MyConfigElement element in settings)
{
    Console.WriteLine(element.Key);
    Console.WriteLine(element.Setting1);
    Console.WriteLine(element.Setting2);
}
Here's a screenshot in debug mode:

Tuesday, October 16, 2012

Implementing Custom Configuration Section - Part 1

.Net has made adding, and reading configurations from config files, app.config, web.config, machine.config, really simple. You can use appSettings sections to manage name value pair config, and connectionStrings sections to manage the connections strings to database. But, it has also provided a really simple way to create your own custom sections, and read it from the code. There are various reason why you want to do this way if appSettings does not fit your need. It's more readable, understandable. I will let you decide on the reasons :).

The code is really simple, so I will not go through it completely, however I will point out some interesting stuffs along the way. So, here you go. Here's a custom configuration section I want to build for.

<MyConfig
    Config1="Config1"
    Config2="Config2" 
    Config3="Config3"/>

And here's the class that can read the values from it:

using System.Configuration;
 
namespace BlogTestSample
{
    public class MyConfig : ConfigurationSection
    {
        private static MyConfig myConfig = ConfigurationManager.GetSection("MyConfig"as MyConfig;
 
        // private configuration properties
        [ConfigurationProperty("Config1", IsRequired = true)]
        private string config1 { get { return (stringthis["Config1"]; } }
 
        [ConfigurationProperty("Config2", IsRequired = true)]
        private string config2 { get { return (string)this["Config2"]; } }
 
        [ConfigurationProperty("Config3", IsRequired = true)]
        private string config3 { get { return (string)this["Config3"]; } }
 
        // public accessors
        public static string Config1 { get { return myConfig.config1; } }
        public static string Config2 { get { return myConfig.config2; } }
        public static string Config3 { get { return myConfig.config3; } }
    }
}

You also need to add the section name definition in configSections of the config file as follows:

<configSections>
    <section name="MyConfig" type="BlogTestSample.MyConfig, BlogTestSample"/>
</configSections>
The type has two params: the full namespace(namespace with class), and assembly name.

Some things to notice here:
  • The class inherits from ConfigurationSection. This basically tells the framework that it is a custom configuration section handler. 
  • The class name matches with the section name, but it doesn't have to. What we need to make sure is the parameter to GetSection() in fifth line must be same as the section name.
  • Each private string represents the configuration property in the config section. 
  • Each public string represents the getter for the private string.
  • If you have other types like int, decimal, just parse, and return the type back.
  • You can use the same format, if you have a config section inside a config section. In this case, your return type is the class that represents the config section.


Thursday, January 19, 2012

Sql Server - "Handy" While loop

I came across a situation today... I wrote a sql script that finds the last record inserted by each user for each day within a given date range. The script was bit tricky, but I managed it. To test it, however, I have to have enough data inserted to the table, and of course delete them when I am done. I could write a console application that could do it. That means new project, sql connection/command, random data generation.  But, something quick and in sql would be nice. You know what I mean !!

While researching I came across "while" loop in Sql Server, and below is how I got the test data generated.

While loop is pretty straight forward in sql:
while <condition>
   begin
   ......
   end

For example:
declare @i int
set @i = 1
while @i<10
  begin
      print @i
      set @i = @i + 1
  end

The output would be: 1 2 3 4 5 6 7 8 9 (each number in new line)

In my case, it would be something like below. I am using a test table, 'myTestTable' which has 4 columns: pk, note, createDate, and userId.
declare @c datetime
set @c = getdate()
while @c > dateadd(dd, -10, getdate())
begin
print @c
insert into myTestTable
values ('my test data', @c, 'chhetri')
set @c = dateadd(day, -1, @c)
end

Neat. This inserted 9 records in my table with different date stamp. If I need more data, say 24 records per day, then while resetting @c inside the loop, I could do:
set @c=dateadd(hour, -1, @c)

Deleting my test data is also simple. I would just look for records that has 'chhetri' in the userId column.

Again, not the only solution. How would you solve it?

Thursday, August 18, 2011

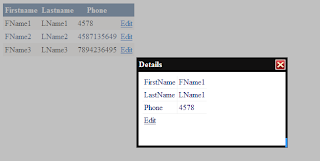
Edit Modal Dialog with GridView

As I am writing this blog, I am wrapping up a task that I just finished working. It was to display some data in Gridview (with edit button) and then pop up a modal window to let user edit data and save. The concept is pretty simple, yet the choices are many. I am using just one of the ways to solve it, and so far the efficient.


The idea here is to create a Gridview, and have a template column with command argument, and command event. Then, when the event gets fired, create your url for the edit page, and assign the url to the iframe source attribute. This way, all the edit logic then goes to the Edit page. Once user closes the window, reload the grid either from database or session (which is what I used).


The Gridview with the edit template column would look like below. Notice the LinkButton has OnCommand event which I have not shown yet.


Then, the panel for the modal window consisting of iFrame will be like below. Notice, in this case, we have onclick event on ImgButton which we have not handled yet.

Now, we need to hook in the Ajax ModalPopupExtender as follows:

Handling the event for LinkButton and ImgButton is very simple.
Here's how code behind for LinkButton looks like:

And here's the code behing for ImgButton:

Now, you simply need to create a EditPage.aspx now that takes in Id from querystring and handle the necessary details.

Here are few screenshots:


Wednesday, August 3, 2011

Format string with Regex

Just discovered something cool today, and most of you guys probably knew it already, but this was new to me, and I am kinda excited sharing it - we can format strings with Regex. That's pretty awesome.

The way we do it is:
Regex.Replace("unformatted string", "regex", "format");
This returns the formatted string. Simple.

For example, To format a phone number string, "1234567899" to (123) 456-7899, we could do something like below:
Regex.Replace(PhoneNumber,@"(\d{3})(\d{3})(\d{4})","($1) $2-$3");

Friday, April 8, 2011

Solving Sql vs C# Minimum DateTime Issue using Extension Method

Do "DateTime.MinValue" in .NET, and you would get "1/1/0001 12:00:00 AM", the default value of DateTime variables. Try inserting it into SQL Server DB, and you will get an exception, because the minimum datetime in SQL Server is 01/01/1753. This is usually not a problem as most of the time the datetime variable is assigned with valid date.

The simplest way to solve it: As soon as we instantiate a DateTime var, assign its value to SqlDateTime.MinValue, like below:

DateTime dateTime = new DateTime();
dateTime = SqlDateTime.MinValue.Value;

However, won't it be much easier if the DateTime, itself, has a method that returns Sql min value? And, this is where we can use Extension methods. Here's a description from MSDN:

"Extension methods enable you to "add" methods to existing types without creating a new derived type, recompiling, or otherwise modifying the original type. Extension methods are a special kind of static method, but they are called as if they were instance methods on the extended type."
Creating extension method is very simple. You need to create a static class that has static method whose first parameter is preceded with this, and specifies what type the method will work on. In our case, it will look like:

public static class DateExtension
    {
        public static DateTime SqlValidDateTime(this DateTime d)
        {
            return SqlDateTime.MinValue.Value;
        }
    }

To use it is even simpler: 
This is definitely not the only way to do it. It reduces code redundancy, and makes code much cleaner if you are assigning SqlDateTime.MinValue after each datetime variable initialization. 
And of course, why insert the min date in the first place?